The Import tool: how to import data
New records can be created and existing records updated with the Collections Import tool.
Note that if your import would update an existing record that is being edited when the import runs, that record will not be updated: be sure that no one is editing records that will be updated during the import. This is not an issue if the import only creates new records.
When an import is initiated, it will run immediately and must complete before you are able to resume working with Collections (it is not possible to schedule an import job to run at a later time).
A large import job can take some considerable time to run and, as noted above, it is necessary to wait for the import to complete before resuming work with Collections. An optional feature introduced with Collections 1.11 makes it possible to run an import job in the background, allowing you to keep working with Collections while an import runs.
Note: This feature is separately licenced and requires Axiell ALM assistance to set up. Please contact your Account Manager or Axiell ALM for more information.
When this feature is available in your system, a Run in background option is added to the Import box:

More details here.
- Select Import in the Main menu.
The Select data source box displays with a list of all data sources you are authorized to work with:

-
Select the data source in which records will be imported or updated (the target data source):
Scroll through the list and double-click a data source
-OR-
Select a data source and click OK or press ENTER.
The Import box displays1:

- Select the format of the import file:
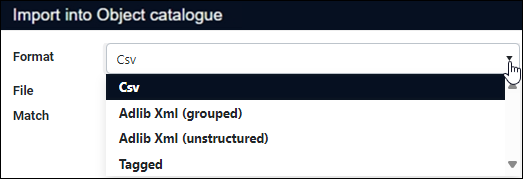
Options include:
Format
Details
Csv
This is the most common import format. Details below.
Note: Details about how to construct a CSV import file can be found here.
Tagged2
The Tagged format corresponds to the Adlib for Windows Tagged file format and is available to assist Adlib for Windows users migrate to Collections.
 Details
Although CSV and XML are the recommended formats for the exchange of data, the Tagged format is available to assist Adlib for Windows users migrate to Collections where the Adlib Tagged file format has been used extensively. Those familiar with the Adlib Tagged file format will find that most Tagged functionality is the same, although some options are omitted as they are not relevant.
A Tagged format file has a
.datextension. The Tagged format consists of a list of field tags and values, one per line; a tag and its value are separated by a space. Records are separated by two asterisks. The following example is an export of two book records with a repeated field:%03 29
ti Great Zulu commanders
ex 70
ex 71
au Knight, Ian
**
%0 718
ti The very sleepy pig
ex 1823
ex 1824
ex 1825
ex 1826
au Malam, John
**
Note the following when importing / exporting the Tagged format:
Field type
Details
If a field is repeated, the tag is listed for each occurrence
If a field in the current record can have more than one value, we add an occurrence of the field for each value (e.g. a book can have multiple authors so we add an occurrence of the author.name (au) field for each author). An occurrence can be a member of a group of fields, and adding an occurrence of the field adds all members of the group at once. of the field; empty occurrences will also be exported.Only the resolved (visible) value in a Linked field is exported; for example, a creator's name in Linked field creator (VV) in an object record is exported. Link reference tags (
lrefs) and their values (the record number of the linked record) are not exported even if included in the list of export fields. This might be a problem when importing a non-unique value into a Linked field as the import will locate the first matching value in the index and link to it. This was no different in Adlib so that functionality remains the same. However it is best to avoid importing non-unique values into Linked fields.Tagged format is not recommended for the export of multilingual data as only the value in the current data language is exported without language attributes (and occurrences that do not have a value in the current data language but do have values in other data languages will be exported as empty occurrences).
When importing a value from a Tagged file into a multilingual field in Collections, the value is given the current data language attribute.
Tip: The recommended format for the exchange of multilingual data is XML as it allows for the export of all translations and associated language attributes.
GeoLocation fields can be exported and imported as place names. GeoJSON fields can be exported but cannot be imported. These two field types are not Adlib compatible.
RTF (Rich Text Format) fields
RTF fields exported from Adlib to ADLIB Tagged file format export all RTF codes along with the field contents. As there are no RTF fields in Collections, RTF codes will be imported as field content.
Additional information for Adlib users:
Adlib parameter files cannot be loaded in the Import dialogue in Collections but it is possible to save import settings in a new Profile (details here).
The Adlib for Windows Process external links and Process internal links options (marked by default) are not present in Collections because they are rather advanced options that most users should never switch off. In Collections, external and internal links will always be processed, which means that Collections tries to find a record in the linked database matching the imported Linked field value (the first one it finds) and then creates the link to that record. If the imported linked field value does not exist in the linked database, a new linked record with the candidate status and the proper domain for the Linked field will automatically be created and the link to that record will be established.
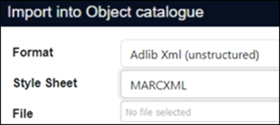
AdlibXML (unstructured)4
Used for the import of data formatted as AdlibXML.
Note: Application Administrators can set up a custom import job to convert a non-Adlib XML exchange file
A file format used for transferring data between different systems or applications. (one that is MarcXML or LIDO, for instance) to AdlibXML in order that it can then be imported into Collections. Details in the Axiell Designer Help.A Style Sheet drop list will display when either of the Adlib XML formats is selected, but it will only be populated if one or more custom import jobs have been configured. If the Style Sheet drop list is empty, simply ignore it (your exchange file already contains structured or grouped AdlibXML); if the import data file contains MarcXML, for example, and an appropriate style sheet has been made available, you would select it from the Style sheet drop list:
Tip: An XSLT style sheet is provided for import of object data from EODEM
Exhibition Object Data Exchange Model exchange files are designed to simplify and streamline the process of sharing information about exhibition and loan objects between different museum collections management systems. exchange files. The registration of third-party objects for loans and exhibitions is greatly simplified when participating parties support the generation and import of data via the EODEM.Custom import jobs and the purpose of a style sheetThere are many ways to organize and code a database, and virtually every database program has its own method of doing so. Furthermore, each database has its own layout for fields, and the number of possible field layouts is enormous. As a result, it is often necessary to use an exchange file to be able to exchange data between database formats.
What is an exchange file?
An exchange file refers to any file format used to transfer data between different systems or applications: the role of an exchange file is to facilitate data exchange. The exchange file is the result of exporting data from the source database to a file format that the target database is able to import.
Exchange file formats are standardized and are usually simple formats that most database programs can export to or import from. Advantages of using exchange files are that there is a limited number of them; and they are usually text files that can be opened and/or edited in any text editor. Common examples include
CSV,XML,JSON, and.pstfiles.In AdlibXML, the XML tree is structured in such a way that Collections understands where an imported record begins and ends and into which fields data from the exchange file should be imported.
MarcXML, LIDO or any XML format other than AdlibXML are structured completely differently and the XML nodes have unknown names. A custom import job is an XSLT style sheet that converts / maps an unrecognized structure and node names to a structure that Collections understands.
In short, if you import MarcXML without a custom import job to convert it to AdlibXML first, Collections does not know into which fields to import data.
More details
Application Administrators will find details about setting up custom import jobs to produce unstructured or grouped AdlibXML for import into Axiell Collections in the Axiell Designer Help.
More details about exchange files can be found in the Axiell Designer Help.
Note: Note that it is not possible to specify a subset of fields to import when importing Adlib XML (Step 6 below).
-
Locate the file with the data to be imported.
-
The Default Record Type drop list will only display if the target data source includes a record type field (e.g. record.type (Df)).
(Optionally) Select a record type from the drop list to apply it to all imported records, e.g.:

- If you want to import data from all fields included in the import file, leave the field list on the right empty (as shown above).
Alternatively, to import data from a subset of fields in the import data file, select fields in the column on the left and add them to the column on the right:
Details
Tip: If you import the same subset of fields regularly, you can set them as defaults. See Settings below for details.
Note: Although you can select the priref
A record's unique identifier (aka Record number). The Record number field is found on the Management details (or Notes and description) panel in Collections version 5.0 onwards. Alternatively, add the priref column to Result set View. The field tag for the priref field is %0. (record number) field, this value will never be imported: newly created records during import will always get a new record number.You can save lists of fields as a Profile and restore these.
ProfilesIf you add one or more fields to the right hand column, you can save these as a profile and restore them next time you run an import and only want to update these fields.
A currently active profile is shown above the Fields column:

To save a list of fields as a profile:
Click Profiles.
The Profiles box displays.
Click Create to add a new profile:
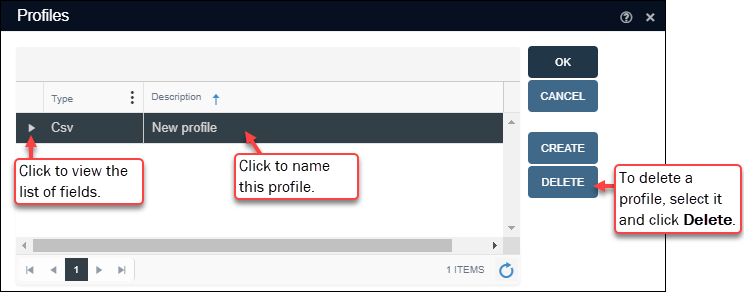
Click the New profile text and type a descriptive name for this field list.
Note: To view the field list that is stored in this profile, click the arrow to the left of the profile type.
Click OK to close the Profiles box and load the selected profile
-OR-
Click Cancel to close the window without loading the selected profile.
To restore a profile:
Click Profiles.
Select a profile in the Profiles box.
Click OK to close the Profiles box and load the selected profile
-OR-
Click Cancel to close the window without loading the selected profile.
Tip: To clear the active profile, click Clear. This will also clear fields from the right hand column.
-
Your next step depends on whether you intend to:
Create new records with this import
If you only want to create new records and do not wish to update any existing records:
-
Do not select a value in Match
-AND-
-
Leave Update only unchecked:
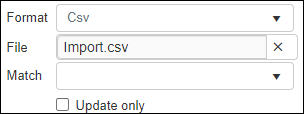
When the import is run, a new record is created for each valid record specified in the import file; no existing records are updated.
Update existing records or create new records
If you want to update existing records or create a new record if no matching record is found:
- Select an indexed field in Match
-AND-
- Leave Update only unchecked:
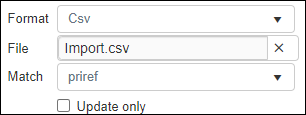
If the value in Match is found in an existing record, the record will be updated with values from the import file; otherwise a new record is created.
The Match field must be a uniquely indexed field in your system, e.g. priref
A record's unique identifier (aka Record number). The Record number field is found on the Management details (or Notes and description) panel in Collections version 5.0 onwards. Alternatively, add the priref column to Result set View. The field tag for the priref field is %0. or object_number (assuming object numbers are unique in your system).Note: It is not necessary to include the field specified in Match in the Fields list (the list of fields you wish to import).
- All field content in existing records that is not being updated will be left as is, so no data is removed from those fields.
- When a field to be updated in an existing record has more than one occurrence If a field in the current record can have more than one value, we add an occurrence of the field for each value (e.g. a book can have multiple authors so we add an occurrence of the author.name (au) field for each author). An occurrence can be a member of a group of fields, and adding an occurrence of the field adds all members of the group at once. already, the first occurrence will be overwritten by the imported value: if the existing record has two occurrences
xandy, and the imported field only contains the valuez, then the resulting two occurrences will bezandy.Importing multiple occurrences of a field is possible if the relevant field name is repeated in separate columns in the import file (explained here). For example, if object_name appears in two columns then the import file may contain two object names. If it does, the two first occurrences of the field in an existing record will be overwritten. If only the first occurrence in the file is filled while the second is not, then the first field occurrence in the existing record will be overwritten while the second existing occurrence will remain as is. If only the second occurrence in the file is filled while the first is not, then the second field occurrence in the existing record will be overwritten while the first existing occurrence will remain as is. If both occurrences in the import file are empty then both field occurrences in the existing record will remain as is. A similar logic applies to three occurrences or more.
Note: It is not possible to have the imported value(s) added as new occurrence(s) and it is also not possible to have all existing occurrences emptied before importing the value(s) from the import file.
Update existing records
If you only want to update existing records:
- Select an indexed field in Match
-AND-
- Check Update only:
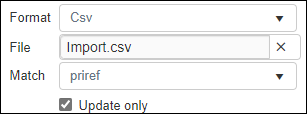
If the value in Match is found in an existing record, the record will be updated with values from the import file. The Match field must be a uniquely indexed field in your system, e.g. priref
A record's unique identifier (aka Record number). The Record number field is found on the Management details (or Notes and description) panel in Collections version 5.0 onwards. Alternatively, add the priref column to Result set View. The field tag for the priref field is %0. or object_number (assuming object numbers are unique in your system).Note: It is not necessary to include the field specified in Match in the Fields list (the list of fields you wish to import).
-
- When importing data in a
.csvfile, a default set of CSV import settings has been defined. If necessary, review and change these in the CSV settings box by selecting Settings: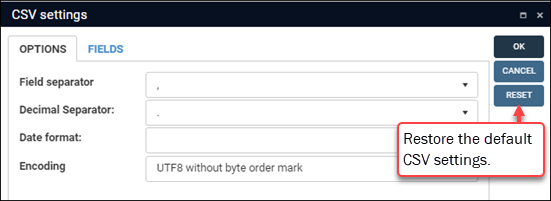
Note: Changes you make apply to the current data source, are associated with your user account and recalled by Collections whenever you log in.
SettingsOptions tabSetting
Details
Ensure that the field separator selected in the drop list is the same as the field separator used in your import data file:
comma
semicolon
To ensure that decimal separators in numerical fields are interpreted correctly when imported, select the decimal separator used in your import data file.
Setting this option instructs the import procedure to expect all imported numerical values to have this decimal separator and if it is different from the decimal separator specified in the target data source
The management of a collection can involve a vast amount of information about objects / items / books, people and organizations, events, administration and more. This information is stored as records in data sources. Each data source stores a specific type of information: details about collection items, people, events, loans, and so on., then those separators will be converted to the right one.Note: If there is a mismatch between the decimal separator in an imported value and this setting, the separator will be removed from the value, importing a value at least ten times too big!
Specify the format used for dates in the import data file to ensure they are interpreted correctly and converted to the appropriate format in the target field.
This option is less strict than the Decimal separator option as it will correctly import dates if they are already in the target format even if the Date format option has been set to some other format. For example, if the target format of the fields is
ISOdate(e.g.2020-07-13) and your import file contains dates in bothISOdateandEuropeandate format (e.g.13/7/2020or13/07/2020), setting the Date format option to dd/mm/yyyy will import all dates correctly. A deviating date format in the import file will generate an error message and the relevant record will not be imported.If you do not specify a Date format for import, Collections expects each imported date to be formatted like its target field, otherwise the date will be imported incorrectly.
Encoding5
Specify the character encoding of the import file to ensure that characters are not converted to incorrect characters during import.
DetailsThe default Encoding option is UTF8 without byte order mark; if your import file has any other encoding, select it from the drop list to enforce the selected encoding when the file is imported. The following encoding options are available:
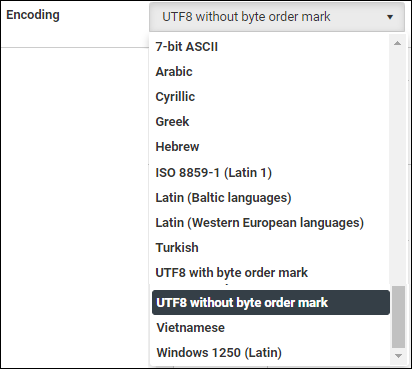
Note that if your file does have a byte order mark, a BOM (a hidden character in a file that tells the processing software which Unicode character encoding to expect from the file), Collections will automatically apply the UTF8 encoding in the file regardless of the option selected in the drop list (you can select UTF8 with byte order mark from the drop list but it is not necessary).
One way to identify the encoding in your import file is to open the file in Notepad++ and select the Encoding menu:
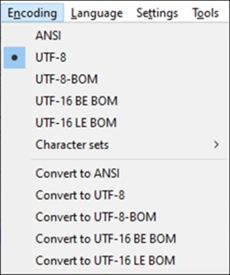
The file's encoding is indicated by the black dot.
Note:
UTF-8is UTF8 without byte order mark.
CSV files created in MS Excel are usually encoded asUTF-8, hence the default option in the Encoding drop list.In Collections versions prior to 1.15, ASCII is the implicitly assumed encoding for all imported CSV files without BOM, while UTF8 with BOM is assumed when a BOM is present.
Fields tabAs we saw in Step 6, if you want to import data from all fields included in the import file, you leave the field list on the right of the Import box empty. Alternatively, you can import data from a subset of fields in the import data file by adding fields to the right column of the Import box. When you add fields to the right column, Collections recalls them next time you access the Import box; these fields are now effectively default import fields until you manually add or remove fields or click Reset. The Fields tab also lists the fields you have added to the right column of the Import box; if you add / remove fields on the Fields tab, the right column of the Import box will update with your changes (and vice versa).
Reset: restore defaultsYou can return the CSV settings box to its default state by clicking the Reset button6. A message will ask you to confirm the reset:

Tip: An option in the Main menu enables you to restore ALL settings you have changed across Collections back to their default. The Reset option in the CSV settings box only affects this box's settings.
When you have made your changes, select OK to save your settings and close the CSV settings box.
- To perform a test run on the import, make sure that Test run is enabled.Option: enable Save after successful test
If your import is large and time consuming, you can enable Save after successful test: when the test run is successful, the resulting records will be saved automatically to avoid the need to re-run the import procedure.
Note: Do NOT enable the Save after successful test option unless you have enabled the Test run option.
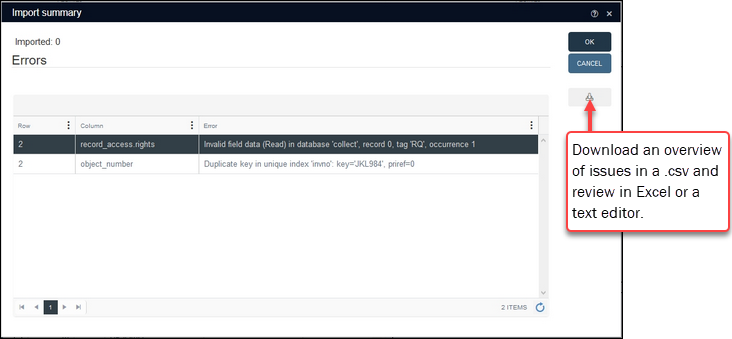
Enabling Test run will mimic the import and provide a report of any issues that need to be resolved before doing the real data import, e.g.:
 What Test run does / does not check
Some of what follows is quite technical and will benefit from familiarity with the Collections back-end and Axiell Designer
A tool for designing, creating, customizing and managing Axiell Collections applications and databases, broadly speaking, the Axiell Collections Model Application. As well as managing databases, including user access and permissions, Designer is used for such tasks as translating field labels, tooltips, values in drop lists, etc.. A test run checks:
- uniqueness: that a value to be imported into a field configured to be unique is unique;
- data type: that the data type of values to be imported (including enumerative Read-only drop lists; their values are added and translated by Application Administrators in the Collections administration tool, Axiell Designer: users can select a value in an enumerative field, but cannot add or translate a value. values) matches the data type of the target field;
- links to other records (including to records that will be imported in the current import);
- validations in before-storage adapls (see the Axiell Designer Help for details about ADAPL A field with an application field type is associated with an application, such as a PDF reader; it is possible to link such a field to a file of the appropriate type (e.g. a .pdf file) and subsequently open the file by clicking the underlined data (typically a filename) in the field.).
A test run does not check:
- write actions in before-storage ADAPLs (and any
errorms as a consequence of&Ebeing greater than zero because write, writeempty and delete are not tested); - whether a Linked field A type of field used to link one record to another. A Linked field is a drop list of values (records that the field can link to). When a link is made, the field stores a reference to the linked record (a linkref). is configured to allow / disallow the creation of a new record in the linked data source when a new value is added to the field (Application Administrators will find more details about the
Allow creation of new linked recordssetting in the Axiell Designer Help); - if the import file includes duplicate values for a field configured to hold unique values;
- if ISO dates have the wrong format (e.g. yyyy/mm/dd rather than yyyy-mm-dd).
Amongst other things, a test run does not simulate the update of any indexes, which is why, for instance, it fails to identify duplicate values in a field configured to hold unique values. When the import is run however, indexes are updated and Collections will not allow a duplicate value in a field configured to be unique.
Solve any issues before attempting the real import:
- Click OK to close this window
-OR-
Download an overview of issues as a
.csvand review in Excel or a text editor.
-
If your test was successful and you did not use the Save after successful test option, disable (uncheck) Test run and click OK to run the import.
Imported records will be presented in Result set View.